
CentOS 7x の初期状態にImageMagickを入れて動かしてみました。ImageMagickのインストールはパッケージの依存などが多いので色々と試行錯誤しました。うまく行ったものを記載しておきます。
Contents
- 1 phpをインストール
- 2 yumでImageMagick ImageMagick-develをインストール
- 3 yumでImagickをインストール
- 4 インストールの確認
- 5 curlの設定
- 6 レポジトリを取得
- 7 phpをインストール
- 8 phpバージョンの確認
- 9 apacheのインストール
- 10 ImageMagickに必要なパッケージをインストール
- 11 ImageMagicのインストール(yumでインストール)
- 12 ImageMagicのインストール(公式ページからインストール)
- 13 ImageMagickのバージョン確認
- 14 Imagickのインストール
- 15 phpifo()でimagickが出ているか確認
- 16 ターミナルでの確認方法
phpをインストール
|
0 1 2 |
yum -y install --enablerepo=epel,remi,remi-php73 php php-devel php-mbstring php-pdo php-gd php-xml php-mcrypt php-common |
yumでImageMagick ImageMagick-develをインストール
|
0 1 2 |
# yum install ImageMagick ImageMagick-devel gcc |
yumでImagickをインストール
yum list | grep imagick でインストール対象ファイルのリストを探す。
|
0 1 2 |
# yum -y install --enablerepo=remi-php73 php-pecl-imagick.x86_64 |
インストールの確認
[ImageMagick]
|
0 1 2 3 |
]# convert -version Version: ImageMagick 6.9.10-68 Q16 x86_64 2020-04-01 https://imagemagick.org |
[Imagick]
|
0 1 2 3 4 5 6 7 8 9 10 |
# php -i | grep imagick /etc/php.d/40-imagick.ini imagick imagick module => enabled imagick module version => 3.4.4 imagick classes => Imagick, ImagickDraw, ImagickPixel, ImagickPixelIterator, ImagickKernel imagick.locale_fix => 0 => 0 imagick.progress_monitor => 0 => 0 imagick.skip_version_check => 1 => 1earchlight8.com/wp/wp-admin/post.php?post=3997&action=edit# |
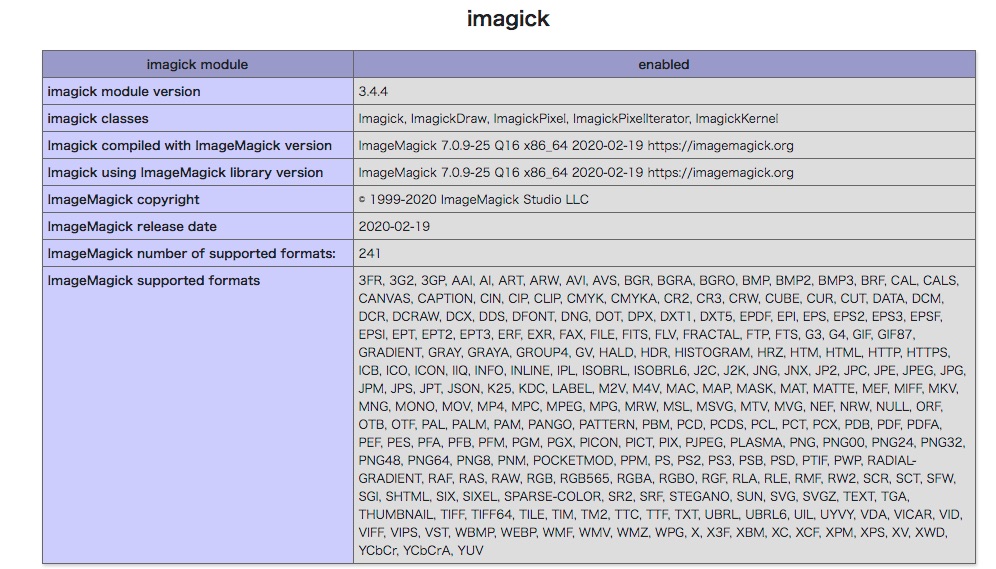
phpinfo()にも表示されればOKです。
php.iniに extension=imagick.so を記載します。
—————————————————————-
ここから下は2019年の記録です。
curlの設定
公式ホームページなどからレポジトリデータなどを取得する時にエラーが出るので、curlで外部のファイルを取得できるように設定します。
|
0 1 2 |
# yum update curl |
レポジトリを取得
2つのレポジトリ「epel」と「remi」をインストールします。
epel
|
0 1 2 |
rpm -Uvh https://dl.fedoraproject.org/pub/epel/epel-release-latest-7.noarch.rpm |
remi
|
0 1 2 |
rpm -Uvh http://rpms.famillecollet.com/enterprise/remi-release-7.rpm |
※上手くダウンロードできないときはミラーサーバーを設定
rpm -Uvh http://remi.conetix.com.au/enterprise/remi-release-7.rpm
phpをインストール
|
0 1 2 |
yum -y install --enablerepo=epel,remi,remi-php73 php php-devel php-mbstring php-pdo php-gd php-xml php-mcrypt |
phpバージョンの確認
phpがインストールされたか確認してみます。
|
0 1 2 3 |
php --version PHP 7.3.15 (cli) (built: Jan 23 2020 09:05:58) ( NTS ) |
PHPのバージョン 7.1.33 がインストールされました。
apacheのインストール
|
0 1 2 |
yum -y install httpd |
ImageMagickに必要なパッケージをインストール
|
0 1 2 3 4 |
# yum install fftw3 # yum install libXt # yum install libtool-ltdl |
ImageMagicのインストール(yumでインストール)
|
0 1 2 3 4 5 6 7 8 9 10 11 |
$ yum -y install --enablerepo=epel,remi,remi-php73 php php-devel php-mbstring php-pdo php-gd php-xml php-mcrypt $ yum install ImageMagick ImageMagick-devel gcc $ yum install --enablerepo=remi,remi-php73 php-pear $ yum install --enablerepo=remi,remi-php73 php-devel $ yum -y install gcc make $ pecl install Imagick |
これでインストールが完了です。
ImaegMagickのバージョン確認
$ convert -version
php.ini に「extension=imagick.so」を追記します。
ImageMagicのインストール(公式ページからインストール)
3つのファイルをインストールします。
https://imagemagick.org/のダウンロードページ
バージョンは変更されている可能性があるので、上記ページで必ず確認しましょう。
|
0 1 2 3 4 |
# yum install -y https://www.imagemagick.org/download/linux/CentOS/x86_64/ImageMagick-libs-7.0.9-25.x86_64.rpm # yum install -y https://www.imagemagick.org/download/linux/CentOS/x86_64/ImageMagick-7.0.9-25.x86_64.rpm # yum install -y https://www.imagemagick.org/download/linux/CentOS/x86_64/ImageMagick-devel-7.0.9-25.x86_64.rpm |
ImageMagickのバージョン確認
|
0 1 2 3 4 5 6 7 |
# magick --version Version: ImageMagick 7.0.9-23 Q16 x86_64 2020-02-14 https://imagemagick.org Copyright: © 1999-2020 ImageMagick Studio LLC License: https://imagemagick.org/script/license.php Features: Cipher DPC HDRI Modules OpenMP(3.1) Delegates (built-in): bzlib cairo djvu fftw fontconfig freetype gslib jng jp2 jpeg lcms ltdl lzma openexr pangocairo png ps raqm rsvg tiff webp wmf x xml zlib |
Imagickのインストール
remiを指定してphp-pearとphp-develをインストール。
|
0 1 2 3 |
yum install --enablerepo=remi,remi-php73 php-pear yum install --enablerepo=remi,remi-php73 php-devel |
|
0 1 2 |
pecl install Imagick |
makeが無いと言われるときは
# yum -y install gcc make
を実行してから pecl install Imagick を行う。
インストールが終わると
|
0 1 2 |
You should add "extension=imagick.so" to php.ini |
というコメントが出るので、php.iniに extension=imagick.so を加えます。
phpifo()でimagickが出ているか確認
インストールが成功すると phpinfo(); に imagickが表示されるようになります。
ターミナルでの確認方法
|
0 1 2 3 4 5 6 7 8 9 |
# php -i | grep imagick imagick imagick module => enabled imagick module version => 3.4.4 imagick classes => Imagick, ImagickDraw, ImagickPixel, ImagickPixelIterator, ImagickKernel imagick.locale_fix => 0 => 0 imagick.progress_monitor => 0 => 0 imagick.skip_version_check => 0 => 0 |
imagickのバージョンの確認
phpをremiでインストールしているとき、yum install imagicを実行するとエラーが出ます。
こちらは使わないですが、yumのimagickのリストの表示方法です(参考)
|
0 1 2 3 4 5 6 7 8 9 10 11 12 13 14 15 16 17 18 19 |
# yum list | grep imagick php-pecl-imagick.x86_64 3.1.0-0.6.RC2.el7 epel php54-php-pecl-imagick.x86_64 3.4.4-1.el7.remi remi-safe php54-php-pecl-imagick-devel.x86_64 3.4.4-1.el7.remi remi-safe php55-php-pecl-imagick.x86_64 3.4.4-1.el7.remi remi-safe php55-php-pecl-imagick-devel.x86_64 3.4.4-1.el7.remi remi-safe php56-php-pecl-imagick.x86_64 3.4.4-1.el7.remi remi-safe php56-php-pecl-imagick-devel.x86_64 3.4.4-1.el7.remi remi-safe php70-php-pecl-imagick.x86_64 3.4.4-1.el7.remi remi-safe php70-php-pecl-imagick-devel.x86_64 3.4.4-1.el7.remi remi-safe php71-php-pecl-imagick.x86_64 3.4.4-1.el7.remi remi-safe php71-php-pecl-imagick-devel.x86_64 3.4.4-1.el7.remi remi-safe php72-php-pecl-imagick.x86_64 3.4.4-1.el7.remi remi-safe php72-php-pecl-imagick-devel.x86_64 3.4.4-1.el7.remi remi-safe php73-php-pecl-imagick.x86_64 3.4.4-1.el7.remi remi-safe php73-php-pecl-imagick-devel.x86_64 3.4.4-1.el7.remi remi-safe php74-php-pecl-imagick.x86_64 3.4.4-6.el7.remi remi-safe php74-php-pecl-imagick-devel.x86_64 3.4.4-6.el7.remi remi-safe |